Once again, aTi was a phenomenal experience. I simultaneously received enjoyment and frustration from breaking out of my "comfort zone;" excitement definitely won out though.
Deborah's course made me realize how many of today's consumers need to have appreciation for the process of artistic creation. It's very easy to go to big retailer and buy dishes, pots, mugs, and other clayware. However, when you buy things that way, you have the same pieces as thousands of others (makes me think of the houses in Edward Scissorhands) and, more importantly, you have a piece that was generated through mass production. "All Things Clay" made me more appreciative of the entire process of clay creation.
Although I consider myself to be a patient person, using the potter's wheel truly tested my patience. It was frustrating to go through the steps of mounding the clay, patting the clay, creating the bottom of the mug/dish/bowl, elongating the piece,...and then have the piece completely crumble. This was a valuable experience though. As adults, we often gravitate toward activities in which we know we will be skilled. Who would willingly try something at which she would struggle and/or possibly fail? I would say that, ultimately, I failed at the potter's wheel. However, whereas I normally (adult me) give up easily, I do feel compelled to try the wheel again in the future.
In terms of next year's aTi sessions (I'm already thinking ahead), I'm not sure what path I will take. Poetry, the familiar path, is one option. I would also gladly try "All Things Clay" again to see how much I could improve my skills. Songwriting fascinates me, but I literally have no singing skills. Digital photography also interests me. Foolishly, my mind thinks All you have to do is press your camera's silver button and be done with it. I know that photography is much more complicated than that.
Who knows what next year will bring, but I am grateful that I had the opportunity to participate in aTi 2013 at William Paterson University.
Although he is often the bearer of humor rather than wise words, I thought that the following Jerry Seinfeld quote was representative of my aTi experience:
"You have to motivate yourself with challenges. That's how you know you're still alive."
Friday, August 9, 2013
Sunday, August 4, 2013
Day five: Afternoon presentations
After lunch (and giving into the fifth consecutive day of Panera cookie consumption), the final aTi presentations began. Each class was given about 20-30 minutes to showcase the work they completed within the week. Much like last year, it was remarkable to see the progress that people made over the course of five days.
The oil painting class had an array of work which they displayed. Some pieces were clearly done by "seasoned" artists (Chris' portrait was phenomenal-- the subject's eyes were mesmerizing), but the pieces done by less experience artists were also beautiful too. The thing that I like about aTi is how the program is so welcoming to teachers of all different levels and disciplines. I spoke to one woman who had never done oil painting in her life. With the guidance of teacher Kit Sailor, this woman was able to create lovely, proportionate paintings; most of her paintings featured lemons and I absolutely loved them!
The songwriting class fascinated me, most likely because songwriting elements (similes, metaphors, symbolism, repetition, rhyme) also appear in my coursework. There was variety in terms of the songs that participants composed. One student created a song with Miles Davis' music in the background; it reminded me of spoken word poetry. Another student created a happy children's song about summer. Another participant wrote a haunting song with the chorus: "Fireflies in your eyes..."
The students in Printmaking and Book Arts produced equally impressive pieces. Nowadays, we buy so many items that are mass-produced; people forget about the work that goes into something as seemingly "simple" as a notebook or journal. Likewise, in our All Things Clay class, Deborah spoke about mass productive versus handcrafted, individual pieces.
When aTi participants came into our classroom, we each demonstrated a task for viewers. I demonstrated how to roll out a slab and flatten it on the slab board. It's a task that seems easy enough, but when you actually try it (like most other activities in life), it is harder than it originally seemed.
Posted below are some of the photos from our All Things Clay showcase. We arranged all of our pieces by color, instead of arranging our pieces at individual tables. I liked that we displayed all of our pieces together because it further evoked the feel of us working together as a class.
Below are photos from our All Things Clay showcase. Photos 1-4 were taken by Jenifer Simon; the rest were taken by me.
 |
| These are some students' bisque pieces. I love the detail that some of the pieces have. |
 |
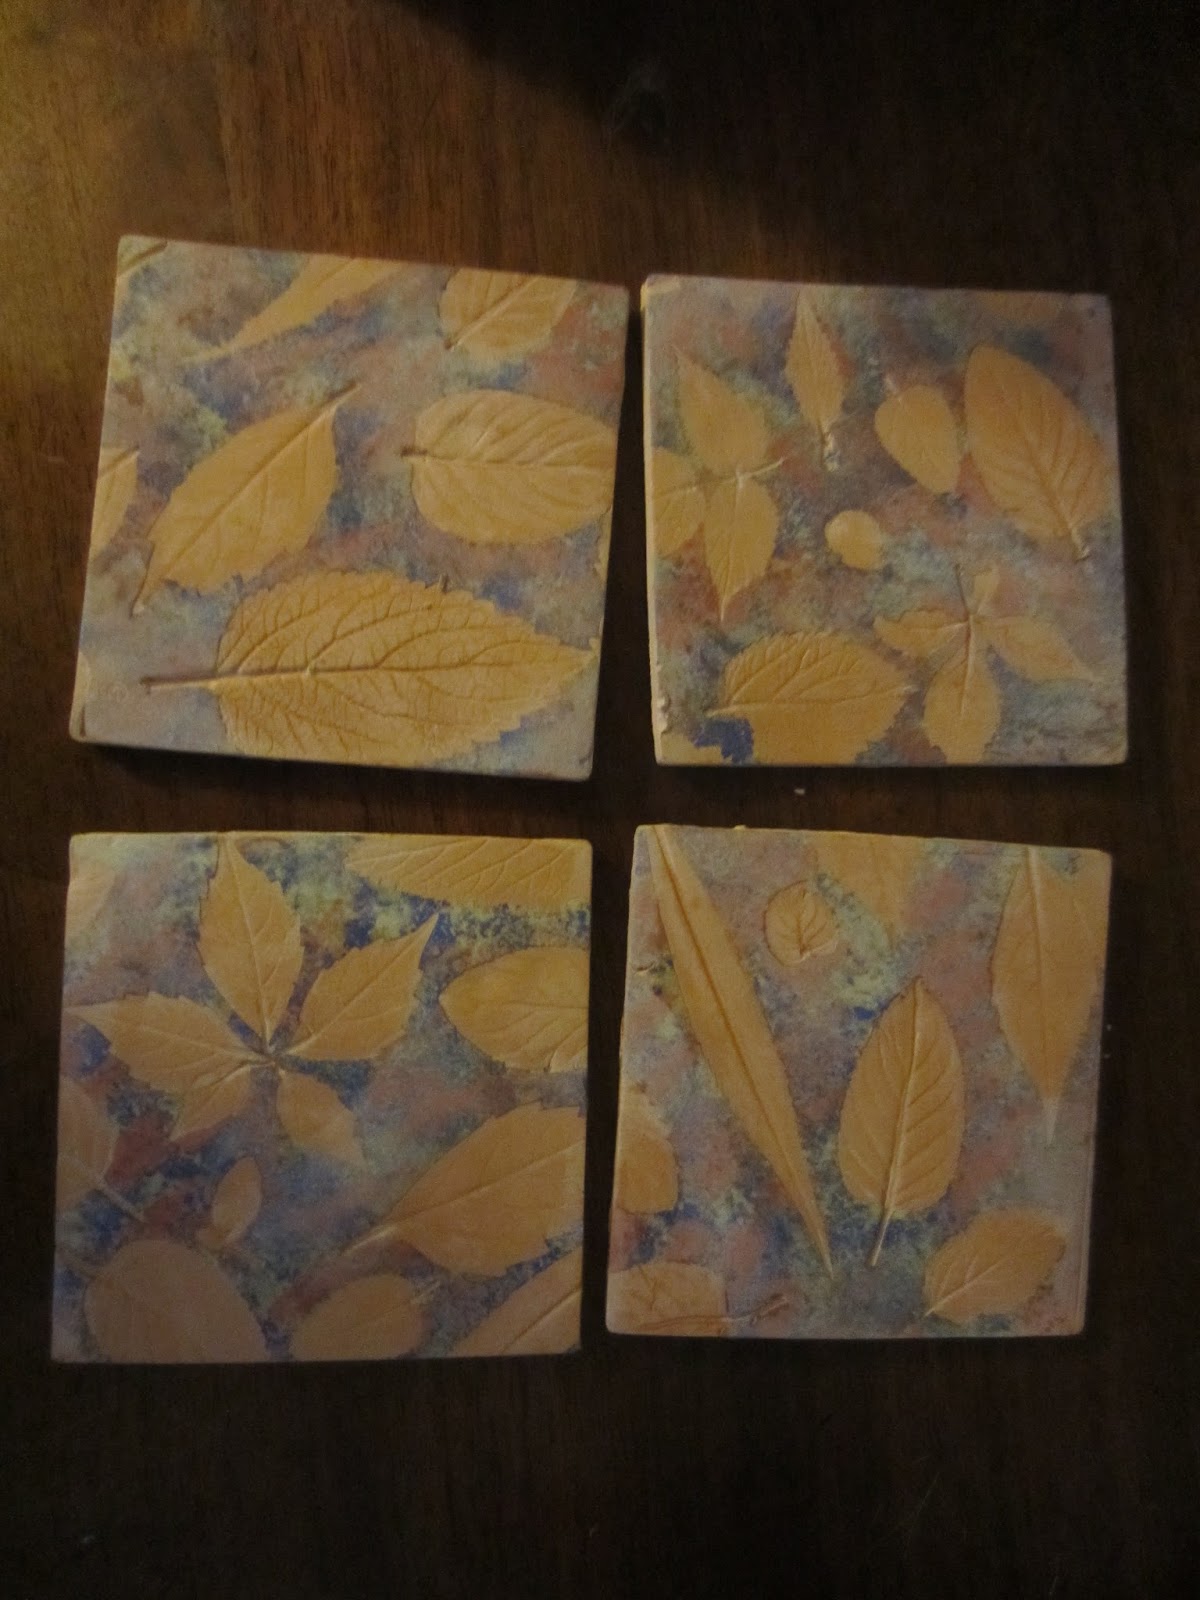
| These are the tiles that we made. We used butcher's wax (clear) and shoe polish (brown) to increase the prominence of the leaves' veins. The substances were applied over the leaf indentations and then were quickly removed. |
 |
| "They like us. They really like us!" |
 |
| Most of these pieces feature a glaze called "rainbow burst"--how fun! My pitcher is second from the left. With the rainbow speckles, it looks "okay." It definitely could be classified as kitsch and I have no problem with that classification :) |
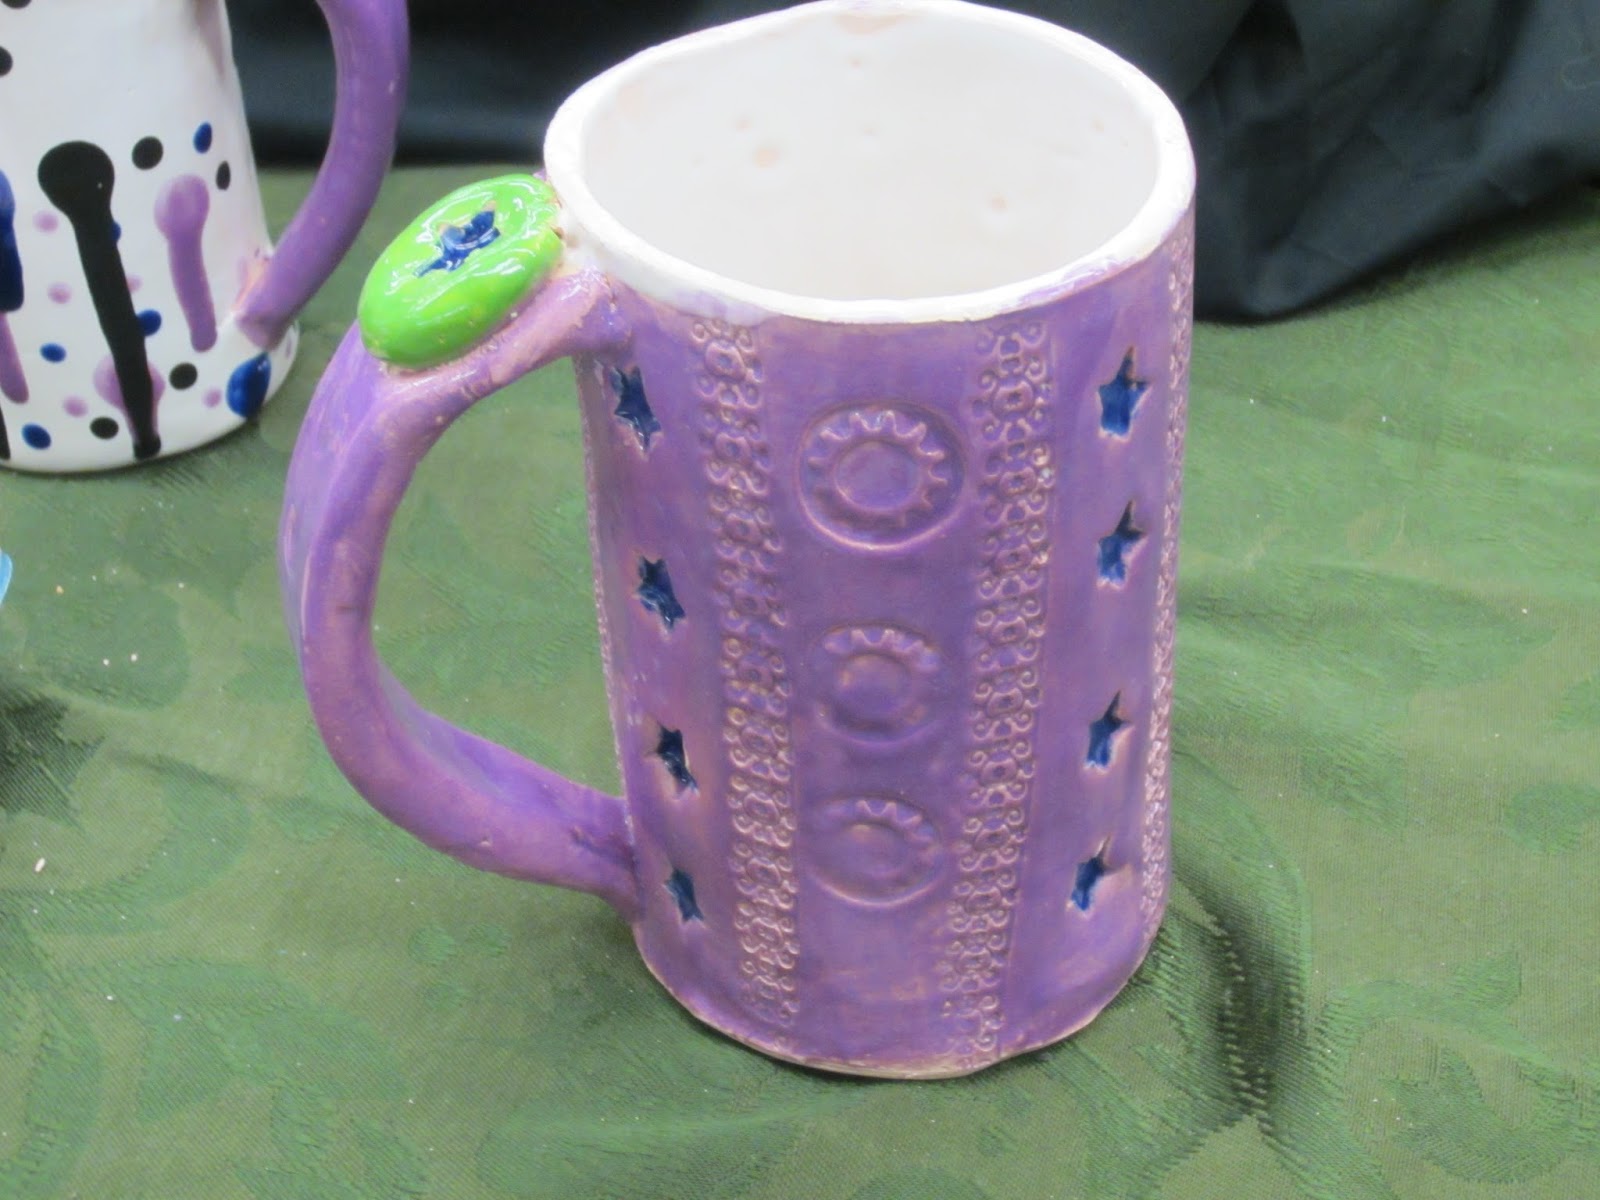 |
| My mug!!!! I love how the colors came out so vividly. I also love the gigantic size of this mug. I haven't figured it out yet, but it's at least 2 cups of coffee! There are some spots, however, where I could have applied more glaze. This is a lesson learned for next time: 2-3 applications of glaze MEANS 2-3 applications of glaze:) |
 |
| These are my tiles with the butcher's wax applied and then removed. |
 |
| These are some of our other final pieces (most of them are Raku pieces). |
 |
| Here are more of our pieces on display. Sarah spent so much time creating the skull piece; I'm glad it came out so beautifully. Some of the mugs and other pieces had a drip-like glaze. I like the effect of the gray and green merging together. |
 |
| This is Tracey's piece. She did not have the chance to use glazes on it, but instead used pastels and a black paint for the indentations. It's lovely! |
Raku video
Somewhere out there is a video of our group completing the Raku process. For now, this video from Youtube will have to suffice. This video will give people an idea of the Raku process from start to finish.
http://quietube6.com/v.php/http://www.youtube.com/watch?v=XaZbSHj23mo
http://quietube6.com/v.php/http://www.youtube.com/watch?v=XaZbSHj23mo
Day Five-- Raku
We spent most of the morning completing the Raku process. For our Raku pieces, we used a special glaze on day four. For Raku, pieces are removed from the kiln while they are basically glowing from the intensity of the temperatures. The piece is then put onto a "nest" of flammable material (in our case, we used newspaper shavings and wood shavings) and quickly covered. The result is a mixture of color and various "crackles" within the piece. Any parts of the piece that are not glazed will turn black during the Raku process.
When taking pieces out of the kiln during the Raku process, pieces can be as hot as 2100 degrees Fahrenheit. We all had to wear protective goggles and gloves. Deborah and two brave volunteers from our group, Sarah and Christine, also wore "leathers" to protect their bodies. Their task was to use tongs and take the pieces out of the kiln.
Once the pieces started coming out of the kiln, the process was exciting and scary. Some of the more oddly shaped pieces were especially difficult to handle with the tongs. I give Sarah, Jennifer, and Meghan so much credit for volunteering to take the pieces out of the kiln. Being that I am accident-prone (case in point: I once deeply cut my hand by trying to open a coffee can), I did not volunteer to take the pieces out of the kiln.
Below are photos of the Raku process. Please note: photos 1-8 were taken by Jenifer Simon. She's a stealthy photographer; she took so many pictures during aTi, but I didn't even realize she took them until they were posted online!
 |
| aTi All Things Clay: Back row: Sarah, me, Karen, Barbara-Jill, Jenifer, Tracey, Sue Front row: Christine, Meghan, Deborah I'm not wearing my goggles in the photo because they made me look like a Power Ranger. In retrospect, maybe that isn't such a bad thing! |
 |
| Our "nests" are ready... |
 |
| Our pieces "glowing;" this kiln has a crank-style function on the side so that you can open it during the firing process... |
 |
| Deborah, our fearless leader, taking some of the pieces out of the kiln. Notice how they colors have changed, as the glazes start showing. |
 |
| Some of us made "nests" in trash cans instead of in the sandbox. |
 |
| Deborah putting Karen's piece down onto the nest. I am next in life after Karen, but you can't really see me. The Raku process both amazed and terrified me. I stood still for most of the time :) |
 |
| Once the piece begins to smoke and fire, you cover it. The more time you take to cover it, the less variety of "crackles" and abstractness you will get. |
 |
| I forget whose piece this was, but it is simply stunning. The iridescence and total array of colors is lovely; some portions of the piece turned black since the artist chose to not glaze those portions. The multi-colored look is due in part to the glaze. Many of the other glazes were much more subtle colors. |
 |
| This is another piece from someone in my class. Its color is due to the choice of glaze. The Raku process creates the crackles and abstractions (hard to see in this pic). |
 |
| This is my finished glaze. Keep in mind that I am a BEGINNER and am not an art teacher :) From this vantage point, you an see the crackles around the face. Around the eyes and mouth, the Raku process created a coppery look. |
 |
| This is a side view of my fish. |
 |
| This is the bottom of the fish. The coppery tone tells you that the bottom of this piece had flames hitting it for longer than other portions of the piece. |
Wednesday, July 24, 2013
Day 4--Glazing!
On day 4, we opened the kiln and further checked the status of our greenware pieces (greenware is when the piece is "gray clay"). Although some of my pieces were awkward looking, all of my pieces survived the firing process. One student's fish broke in the kiln; for large, closed-air pieces you need to make a small air hole somewhere. Otherwise, the air can basically get trapped in the piece and the piece can explode. Whereas they started out as gray-colored pieces, once our greenware was fired, the pieces had a pale pinkish hue to them.
We spent a large part of the day glazing the pieces. We were also able to see the tiles from the previous day. I had assumed that underglaze was still "shiny" like conventional glazes, but I was
incorrect. Underglaze is basically a matte-like finish.
The glazes that we used were all from a company called Mayco. Deborah had small ceramic shards that featured the glaze colors; that way, we could get an accurate idea of the actual color once the piece was glazed. The specific Mayco glaze we used was "Stroke N Coat." This glaze is excellent for classroom situations since it is easy to apply, has reliable color, and can be fired in many different situations. I have to admit that the Language Arts teacher in me simply LOVED the names for the glazes: Moody Blue, Teal Next Time, Silver Lining, Green Thumb, Old Lace... these names all made me smile:)
Deborah described the firing process to us, informing us of the various cones and temperatures that needed to be used. We fired with one 04 and our pieces eventually reached a temperature over 1900 degrees Fahrenheit. Honestly, the firing process specifics completely baffle me. I never realized how much science was involved with clay and ceramics.
Using glaze is tricky because even though the glaze container shows the hue, the color is always darker after it is glazed. Using multiple color glazes is also challenging; you have to keep a steady hand. Another key to using the glazes is to make sure that you use 2-3 even coats of the glaze. Although we were essentially "painting" our pieces, doing all of them at once took quite a bit of time. I'll admit that I found myself getting lazy and "cutting corners" with some of the multiple coats of glaze.This laziness happened when I glazed the small sushi plates. The pieces looked like they were sufficiently covered with glaze; it was only until day 5 that I saw the impact of my laziness. (cue suspenseful music: dun, dun, dun)...
 |
| This is my coveted mug. I glazed it in "grape" (there's 2 layers of glaze, but it is hard to see. I decided to make the stars a bright blue-- painting those stars was a pain!) |
 |
| These are our pieces in the kiln. The glazing process is deceiving. All of the pieces look muted and neutral. Patience will make them vivid and unique. |
Making it look easy
I have a video of Deborah's demo, but Blogger is giving me issues. In addition to pottery challenges, I guess I also have tech challenges. Instead, I am going to post two demo-day photos taken by Jenifer Simon.
I wish I had a photo of myself during the potter's wheel "adventure." It would not be the best demo, but it would definitely be humorous. When I finished at the potter's wheel, I had small splatters of clay all over--even in my hair!
I wish I had a photo of myself during the potter's wheel "adventure." It would not be the best demo, but it would definitely be humorous. When I finished at the potter's wheel, I had small splatters of clay all over--even in my hair!
 |
| Based on clothing, I think this is actually Jen D., another aTi participant. She did a stellar job on the wheel. |
 |
| These were three different pieces that Deborah made during her demonstrations. |
Day three, potter's wheel
In the morning, Deborah had given us a demo on using the potter's wheel. She went through the demo slowly and completed it five times. All of us teachers use memory devices with our students on a regular basis; we all know that the sillier phrases tend to be recalled the most. While completing the demo, Deborah gave us some memory devices. I can honestly say that once I started on the wheel, the information that I most vividly recalled was information related to the memory devices.
These are the three most "vivid" memory devices:
1) When starting out with the clay, center it on the potter's wheel plate and make it look like Patrick's house (from Spongebob).

2) When pressing down on the clay, make a "bear fist."
3) In order to smooth out and increase the height of your vase, mug, or container, use a motion with your hands that is comparable to spreading peanut butter on crackers (except vertically instead of horizontally).
When Deborah did the demo, I watched as closely as possible, trying to embed all of the steps into my memory. I tried taking notes, but it was challenging to focus my attention on the potter's wheel and on the notetaking at the same time. As an additional review measure, I even recorded Deborah's demo and re-watched it before going on the wheel by myself.
I assumed that the wheel would be fairly easy. I tend to be a patient person and figured that once I got my vase started, it would be easy to make it taller and keep it symmetrical.
My experience was the utter opposite of easy. I was able to begin with the Patrick's house mound (easy enough) and was able to turn that mound into a cylindrical container (vase, mug, whatever--I just wanted to make something that did not turn into mush). I was able to create the hole at the top of the container and then flatten out the bottom. The true challenge existed when I tried increasing the height of the container. While the plate spun, the clay would somehow (I tried the wheel many times) get off-centered. The off-center piece would then basically collide with itself and completely sink in. It reminded me of a little child spending a significant amount of time building a sand castle, only to have it quickly washed away by a single way.
I was getting frustrated. The only saving grace was that the other students who tried the wheel with me were having the same issue. I could at least get the clay to resemble some type of vase or container. Others were having trouble with getting the clay mound to have a hole and a flat bottom.
After awhile, instead of being frustrated, I became determined. I wanted to be able to leave class and have some kind of "successful" piece that I made on the wheel. I stayed on the wheel for over an hour and a half. Being on the potter's wheel is a task which requires physical exertion. You have to brace your body over the clay, hovering over the wheel. There's also many motions that you make with your hands. At the end of the day, my hands actually ached.
This was the piece that I created at the end of the day... it is about 2 1/2 inches tall and is definitely asymmetrical. However, the piece did not crumble or fall apart and, to me, that is a small success for the day.
 |
| This is actually a photo of the piece with underglaze on it (after firing). |
Wednesday, July 17, 2013
Day three--- Take the easy task first
For day three, Deborah gave us two tasks to complete (one task in the morning, one task after lunch). Still wary of challenge, I chose to complete the easier task first.
Deborah showed us how to create tiles with the use of resist materials. After throwing the slabs and flattening them, we embedded them with leaves and flower stems. It was fun to figure out where to space the leaves and stems. Deborah had also brought in some mint, so there was a wonderful scent during this process too.
The next step was to put underglaze over the entire clay square. The leaves and organic materials resisted the underglaze. Deborah encouraged us to experiment with various colors of underglazes. Underglaze is put on greenware and then put in the kiln. It has a matte finish. After the underglaze dried (aided through the use of a hairdryer or blowtorch), we carefully peeled the leaves off of the clay. The pieces were then put in the kiln.
 |
| Here is the slab with the embedded leaves and layer one of underglaze. |
 |
| Here is the slab again, with a second layer of underglaze (yellow). Later, I also added red. |
 |
| After the leaves were carefully removed, I used a block cutter to form the shape for four tiles. |
 |
| Close-up of tile before it went into the kiln |
 |
| Pieces from day one and two---already out of the kiln. That fish.... yikes:) My pitcher got a crack in the unwieldy spout. Everything "survived" though--yay! |
Day two photos and captions
 |
| This is step one of creating a mug or pitcher. You use a cylinder to mold the shape. |
 |
| This is my pitcher. Adding that spout was incredibly hard. I realize that it is disproportionate. Maybe I'll stick to mugs. |
 |
| This is my mug. I had fun with adding textures. The handle came out okay. I'm a beginner:) |
 |
| This was our end-of-the-day activity. |
 |
| Our greenware in the kiln. |
Day two
On day two I used a staple gun and didn't injure my finger---that in itself is a huge accomplishment.
Part of the morning session was spent by creating a slab rolling station. We took large pieces of wood and adhered a "clay-friendly" fabric to them. Then, with staple guns we attached rulers (vertical) to the wood. The idea is that when you use a dowel to roll out your clay, you will be able to know when your clay is flat enough. Throwing the clay slab and flattening it is not as easy as it looks. I quickly discovered that pottery requires quite a bit of hand strength. Whenever I would think my clay slab was flat enough, Deborah would point out that there should not be space between the dowel and the rulers.
Deborah showed us how to use tubes in order to create the bodies for mugs and pitchers. When attaching the "body" to the circular base, it is normal to have seam lines showing. One method of removing the seam lines is by using water and your fingers to smooth out the surface.
Deborah instructed us on a current trend (I feel like that's not the exact right word) in pottery: deconstruction. The idea is that the true art of pottery lies in the fact that a person is creating it, not some machine. If the piece has visible seams, it is acceptable because it shows the handicraft behind the piece. For the rest of the day, whenever Tracey (another class participant) and I made mistakes, we would simply blurt out, "It's deconstruction."
In addition to showing us how to make the bodies and bases, Deborah also showed us how to add texture to the pieces. Adding texture was one of my favorite parts of the process. You basically take stampers (either rolling cake decorating stampers, rubber stamps, or homemade stamps) and indent the clay. She showed us how you could disguise a seam by adding texture.
While making the body and base of the mug was pretty easy, making the handle was exceptionally more difficult. When I watched Deborah make the handle, she made it look easy and the clay moved in her hands delicately. I guess the true sign of a master is that he/she completes challenging tasks with the utmost of ease.
I felt frustrated at this point. It bothered me. Why could't I make a (seemingly) simple handle? If you do things correctly, the clay can glide through your fingers. I was challenged though--the awkward movement of the clay through my fingers reminded me of when I first tried ice skating. Instead of elegantly gliding on the ice, my feet staggered, moving forward, but then braking.
Even more challenging of an experience was when I created a pitcher. Again, the base and body were manageable. The handle was still challenging and, on top of that challenge, adding the spout was incredibly difficult. The spout's proportions looked awkward when compared to the rest of the pitcher.
Today was frustrating, but it made me have a personal connection to my students. I feel that I teaching writing pretty well. We read sample essays together, discuss the positive attributes of the writing pieces, use graphic organizers to pre-write, draft, and revise. I do all of the necessary instructional steps, just like Deborah. When students get frustrated, I now can relate to them. In all honesty, I've tried many diverse activities in life, but whenever I have been challenged, I have often quit. Cases in point include: playing the clarinet (when we got to the high notes, I quit band), rollerblading (I tried it for an hour and then gave up), and jewelry making (beading was easy enough, but creating links was hard and I would somehow always coax the instructor into doing the hard work for me).
What I love about aTi is that it gets me out of my comfort zone. Last year, I took the poetry class and while it had its challenging moments, nothing compares to the challenge I have felt with pottery. Deborah is an amazing instructor though. For the last part of the afternoon, she had us use rubber stampers to make sushi plates. It was ridiculously easy and made me end the day with a smile.
Tuesday, July 9, 2013
Reflections, day one
Since aTi is running from 9-5, I figured I would go home after the coursework, relax for a bit, and then go to the gym. After day one, I was exhausted once I got home. My whole body felt like it had experienced an arduous workout. My hands felt fatigued.

I'll admit it. When I chose "All Things Clay," I wanted to venture into unknown territory, but I also wanted a course that would be very manageable. It's foolish, but I assumed clay work just involved making mounds of clay, shaping the mounds a lil', and then painting them. I was quite wrong in my assumption.
During the morning, we learned how to make pinch pots. Making pinch pots is one of the most basic steps in pottery. It requires a lot of control with your hands; it also requires a lot of patience. We were told to make two pinch pots and then merge them together in order to form the "base" for creating a small animal figure. My two pinch pots greatly varied in size. After merging them together, I used my pottery tools to shape the two pieces. Most of us were following Deborah's demo and creating fish figures.
The two aTi participants on both sides of me were creating beautiful, graceful figures. See if you can find my figure:

Besides the fact that I have my name tag on, you can tell which figure is mine. It lacks grace and resembles a bottle rocket more than a fish. Other people created cute "googly eyes" for their animals. I tried to follow suit, but my fish looks like it has some kind of visual impairment. Creating the fish was frustrating.
After lunch, we were shown how to add coils to a base in order to begin creating sculptures. Others were sculpting heads and intricate animal skulls. I wanted to keep things simple, so I chose to sculpt a watermelon half. How hard could a semi circle be?
It turns out that building coils upon coils to make a sculpture is challenging. It did not matter that I chose an "easier" shape than the others. I spent three hours of our afternoon session adding layers and layers to my watermelon piece.
 |
| Using coils to make sculptures |
 |
| In this photo, I am using a paddle to smooth out flaws (bumps, cracks, uneven areas) on my "watermelon" piece. This piece started out with many layers of coils. |
After day one, I have realized how complex pottery can be. I used to go to craft fairs, see pottery pieces on display, and think, "Eh. That's easy. You just shape the clay into a mug or bowl and paint it." I now have a completely different point of view in regard to pottery.
Deborah told our class a meaningful anecdote. She told us about an old Japanese potter who was using the potter's wheel and creating a piece. An onlooker asked how much the potter would charge for the piece and the potter replied with an amount that was perceived as expensive. The onlooker commented that lots of money for two minutes on a potter's wheel seemed like a "good gig." The Japanese artist responded, "It took me two minutes and 80 years to make this piece."
Deborah, our art master, makes pottery look easy. As a student, I quickly realized that things that look easy seldom are easy.
Why Clay?
I wonder what the "stats" are on aTi participants who are "repeat offenders." My first experience with aTi was during the summer of 2012. It was an unforgettable experience and, much like the planning that goes into the Macy's Thanksgiving parade, after day one I was already contemplating what workshops I would take in the following year.
My 2012 workshops took place at Stockton College with poet Peter Murphy. Being away from the hustle and bustle of life at home was refreshing, as I could focus on my craft of writing. I went through the full gamut of emotions during my aTi week at Stockton. I experienced the frustration of sitting in front of a notebook page and writing a mere five or six words within 30 minutes. I experienced the process of revision in which a short poem could be condensed even more than I could believe. Some of my poems went through five or six drafts, which was an experience I had never previously had. Mornings were spent creating and discussing prompts. In the late morning, Peter would "release" our group and allow us to walk around campus for inspiration and solitude. Our afternoons were spent by reading our drafts aloud and commenting. After each day, I felt extremely tired because I had truly worked. Each day was a fulfilling experience, but each day was also an experience that required constant focus.
When I was choosing an aTi workshop for this year, poetry crossed my mind again. Poetry, however, is familiar to me. I would never classify poetry as "easy," but it is definitely manageable and makes me feel comfortable.
I wanted to step out of my comfort zone.
My only prior experiences with pottery are superficial ones. I used to go to "ceramics" when I was in middle school. We would paint bisque pieces and Lil, who ran the ceramics shop, would immediately take over and complete the challenging parts of your piece. I also have gone to places like Color Me Mine where you paint pieces made from molds and the employees do the "dirty work" of firing the pieces in the kiln.
At the beginning of each school year, words such as speculative, persuasive, narrative, expository, and argumentative roll off my tongue. Often, my incoming sixth graders look at me with wide-eyed expressions. "But we've never written those essays before," one brave student will inevitably state. I do my best to calm down the students and assure them that they will be able to navigate the various writing genres during the course of the school year.
I chose the aTi course "All Things Clay" because I wanted to have that experience of being in new, unfamiliar territory. I take professional development courses often during the school year, but the coursework always focuses on literacy, an area in which I am comfortable.
Louis E. Boone once stated, "Don't fear failure so much that you refuse to try new things. The saddest summary of a life contains three descriptions: could have, might have, and should have."
As I progress through my aTi work this week, I will certainly keep Boone's words in mind.
Subscribe to:
Posts (Atom)